Stupid Remote v4: TV remote control Web App
Stupid Remote is a web app that controls devices over HDMI CEC and infrared: turning tvs on and off, switching inputs adjusting volume. Customization requires editing simple HTML and JavaScript and uses cec-client and lircd for control.
Introduction
This project was written out of frustration fighting with ‘smart remotes’. Stupid Remote was created to use HDMI CEC and infrared remote control commands. It might not be simpler, but it is a better solution for me and it might for you.
The target platform is a Raspberry Pi running either Raspbian or OSMC (OSMC is a Raspbian based distribution that boots into Kodi.)
The How: HDMI CEC
Most modern HDMI connected devices support Consumer Electronics Control or CEC. It allows devices to send commands to each other, typically to get the TV to switch input and control volume. If you have ever turned on a game console and had your TV automatically change input to that device you have seen CEC in action.
The HDMI CEC commands are natively supported by the Rasbperry Pi hardware; the device must be plugged into the TV and the other devices plugged into the same TV. The `cec-client` command line application is used to scan, query and send commands to the TV and other devices.
These `cec-client` commands will be specific to your setup, for details on how to use `cec-client` please see:
HDMI CEC How to
The default commands that Stupid Remote come with are the ones that work for me and my Samsung TV, the commands you will use will depend on your setup.
The important outcome of this section is to have `cec-clent` commands to run. For example: TV on, TV off and changing inputs.
OSMC/Kodi CEC
If you are using CEC to send commands to OSMC/Kodi, they will not be available to Stupid Remote. This is a known issue and something I am looking at.
Pulse Eight USB-CEC adapter
A side note, there is a USB CEC adapter made by Pulse Eight and it is possible to use this device with `cec-client` on a linux machine that is not a Raspberry Pi, see https://www.pulse-eight.com/.
The How: Infrared Remote Control
First the bad news. Infrared hardware is almost all DIY, there no commercial plug and play devices that are widely available.
Now the good news. The parts for the hardware are very cheap and reasonably simple to put together.
The general approach is to setup an infrared receiver and capture the button presses from your device’s remote control. The next step is to create a transmitter (also known as an IR blaster) to send the button presses to the device.
The key to infrared remote control on Linux is the Linux Infrared Remote Control (LIRC) project. The project includes the `lircd` service, `irrecord` to capture and decode infrared button presses and `irexec` to the transmit the infrared button presses.
All of the details to setup the hardware and software are covered in a 4 part series here:
Linux Infrared Control How tos
Linux Infrared Control Part 1: Receive IR
Linux Infrared Control Part 2: Send IR
Linux Infrared Control Part 3: Final Hardware
Linux Infrared Control Part 4: Trigger Apps via IR
The important outcome of this section is to have `irexec` commands to run. For example changing to a non-HDMI input or navigating the TV menu.
The How: Stupid Remote
With `cec-client` and `irexec` commands ready, the hard work is done, all that remains is to setup Stupid Remote with the desired buttons and actions.
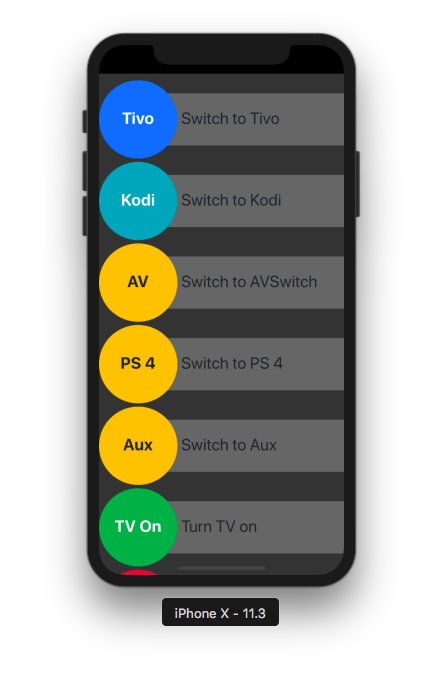
Stupid Remote was written to provide a mobile first, single screen app with big clear buttons. Stupid Remote is implemented as Node Express web app with CEC and LIRC supporting libraries.
Installing Node
The following instructions will install Node on Raspbian or OSMC.
Update and install `build-essential` and `xz-utils`:
sudo apt-get update
sudo apt-get install build-essential xz-utils
The next steps will download the latest version of Node for your model of Raspberry Pi.
Determine what model of Raspberry Pi cpu you have:
uname -m
The results should be armv6l, armv7l or armv8l, this cpu model will be in the download package name found:
https://nodejs.org/dist/latest/
For example `https://nodejs.org/dist/latest/node-v10.4.1-linux-armv6l.tar.xz`
On the Raspberry Pi, download the appropriate package, install it and restart:
wget https://nodejs.org/dist/latest/node-v10.4.1-linux-armv6l.tar.xz
tar -vxf node-v10.4.1-linux-armv6l.tar.xz
cd node-v10.4.1-linux-armv6l
sudo cp -R * /usr/local/
sudo reboot
On restart, confirm Node version:
node -v
v10.4.1
Installing cec-client and LIRC
At this point it is assumed that `cec-client` and LIRC have been installed and there are working commands. If not please see:
HDMI CEC Post
Linux Infrared Control Posts
Linux Infrared Control Part 1: Receive IR
Linux Infrared Control Part 2: Send IR
Linux Infrared Control Part 3: Final Hardware
Linux Infrared Control Part 4: Trigger Apps via IR
Installing Stupid Remote
For purposes of demonstration, Stupid Remote will not be setup as a service, so you can delete it easily. If you like it and want to run it as a service (recommended), see README Install Raspbian or README Install OSMC.
Download the latest release of Stupid Remote:
https://github.com/gordonturner/stupid-remote/releases/latest
For example `4.2.tar.gz`
On the Raspberry Pi, download the appropriate package:
wget https://github.com/gordonturner/stupid-remote/archive/4.2.tar.gz
Uncompress the download:
tar -zvxf 4.2.tar.gz
From the root of the project, update npm and start:
cd stupid-remote-4.2
npm install
Start Stupid Remote:
cd stupid-remote-4.2
node ./bin/www
Alternately run in debug mode:
cd stupid-remote-4.2
DEBUG=* node ./bin/www
Customize Stupid Remote
At the moment, customizing Stupid Remote requires you to edit HTML and JavaScript. It is not hard and there isn’t a lot of if it.
Start by editing the JavaScript, `stupid-remote-X.X/routes/cec.js`. Copy or edit the existing `router.get()` calls to match your `cec-client` command.
Update the swagger-jsdoc in the comments as well, please see swagger-jsdoc Getting Started for details.
For example, the TV On routing handler looks like:
/**
 * handle GET /tvOn request
 *
 *  echo "tx 10:04" | cec-client /dev/ttyACM0 -s -d 4
 *
 * @swagger
 * /cec/tvOn:
 *   get:
 *     tags:
 *       - TV Control
 *     description: Turns on the TV
 *     produces:
 *       - application/json
 *     parameters:
 *     responses:
 *       200:
 *         description: Successfully turned tv on
 */
router.get('/tvOn', function (req, res, next) {
  debug('called tvOn');

  www.cecUsb.sendCommand( 0x10, 0x04 );

  res.writeHead(200, {"Content-Type": "application/json"});
  var html = '{"status":"ok"}';
  res.end(html);
});
Next, edit the default html, `stupid-remote-X.X/public/index.html`.
There are two places to edit, the buttons (between ‘BEGIN Buttons’ and ‘END Buttons’) and corresponding button bindings (between ‘BEGIN Button Bindings’ and ‘END Button Bindings’). These edits should match the buttons and button bindings to the changes to `cec.js`.
For example, the TV On button and button bindings look like:
$("#tvOnButton").click( function( event ) {
  $.get( "./cec/tvOn", function( data ) {
    console.log(data);
  });

} );
Browse to http://HOSTNAME:8181/ and there is a Swagger UI at http://HOSTNAME:8181/api-docs/.
A note about the Swagger UI, you will have to update the url path at the top of the screen to match your hostname.
Conclusion
In retrospect, this project really is a result of my other work on `cec-client`, LIRC and Raspberry Pis. This is an on going project for me that I use daily so expect it to be maintained and periodically updated.
I am not stuck on Node, but it has the bindings for CEC and LIRC and will run even on the oldest Raspberry Pis, but I could see this re-implemented in Python.
Hope you found this interesting and maybe inspired to use that old Pi sitting in your desk drawer for something interesting.