Arduino Screen Controller for Raspberry Pi Part 2 Hardware Prototype
A few months ago I setup a web browser based dashboard running on a Raspberry Pi, displaying weather, time and transit information. It worked out well, but it’s success revealed another problem. Turning the screen on and off multiple times a day was getting old.
So I did what any technically inclined person would do. I decided to create a device to turn the screen on and off by responding to dramatic changes in ambient light. The device would also provide a manual power toggle and button to refresh the browser.
This is part 2 of 3, describing how to use an Arduino to build a USB keyboard emulator to call the hot keys.
- Arduino Screen Controller for Raspberry Pi Part 1 Hot Keys
- Arduino Screen Controller for Raspberry Pi Part 2 Hardware Prototype
- Arduino Screen Controller for Raspberry Pi Part 3 Hardware Final
Although intended to be used with a Raspberry Pi, the screen controller can be used to emulate a USB keyboard and send any desired keystrokes.
Software
- Computer running the Arduino software
Hardware
- Arduino Leonardo
- Micro to Standard A USB cable, to connect Ardunino
- Breadboard, for prototyping
- 2 switches
- 1 light sensor
- Wire to connect components
Links
- Github Arduino Screen Controller
Introduction
Like most hardware projects there is more then one way to implement the hardware. The hardware list is the minimum requirements to build a successful prototype.
There are no resistors listed because the internal Arduino pull up resistors are being used, as a result there is a slightly higher current draw and the logic is slightly more complex.
NOTE: Be careful that whatever key strokes are sent by the device may be sent to the computer running the Arduino software, which my cause ‘undesired results’ and may cause ‘bad things.’
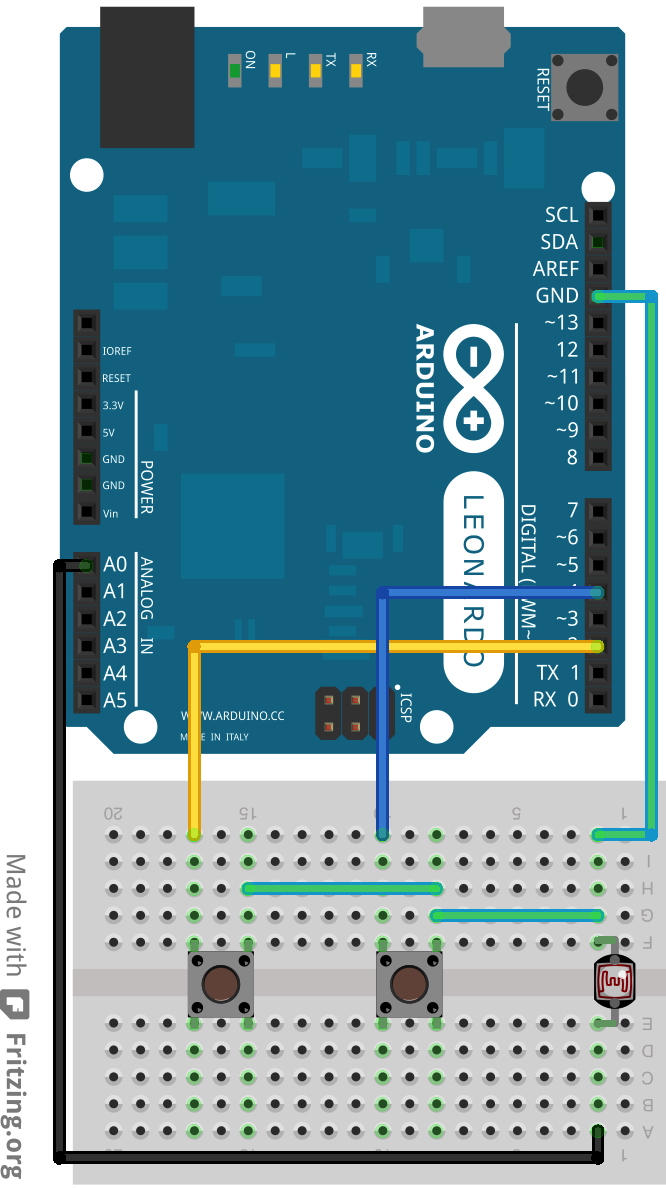
Wiring Diagram
Here is the wiring diagram, as mentioned there are no resistors as internal pull up resistors are being used.
Software
The code is pretty straight forward, the state of the screen saved and the appropriate key presses will be sent.
/*
  Arduino Screen Controller
  =========================

  Processing code for Ardunio Leonardo and Micro to send a text string when a button is pressed.

  - Adapted by Gordon Turner from code by Tom Igoe.
  - Reference:
      http://www.arduino.cc/en/Tutorial/KeyboardButton

  - A push button attached to digital pin 5.
  - 10-kilohm resistor attached from pin 4 to ground.

  - NOTE: Please be careful what the device is plugged into and what has focus, or bad things can happen.

 */

// OSX:
//char ctrlKey = KEY_LEFT_GUI;

// Windows and Linux:
char ctrlKey = KEY_LEFT_CTRL;

// Input pin for the screen toggle push button.
const int screenToggleButtonPin = 2;

// Input pin for the refresh push button.
const int refreshButtonPin = 4;

// Input pin for the screen toggle light sensor.
const int screenToggleLightSensorPin = A0;

// Device state, independent of button state.
// 1 = ON
// 0 = OFF
int currentDeviceState = 1;

// Storing previous state of the screen toggle push button.
int previousScreenToggleButtonState = HIGH;

// Storing previous state of the refresh push button.
int previousRefreshButtonState = HIGH;

// Storing previous state of the screen toggle light sensor.
int previousScreenToggleLightSensorState = LOW;

// Pin 13 has an LED connected on most Arduino boards.
int led = 13;

void setup()
{
  // Set the screen toggle push button pin as an input.
  pinMode(screenToggleButtonPin, INPUT_PULLUP);

  // Set the screen toggle push button pin as an input.
  pinMode(refreshButtonPin, INPUT_PULLUP);

  // Set the screen toggle light sensor pin as an input.
  pinMode(screenToggleLightSensorPin, INPUT_PULLUP);

  // Set the led pin as an output.
  pinMode(led, OUTPUT);

  // Start up the keyboard.
  Keyboard.begin();

  // Read the screen toggle light sensor and set initial value.
  previousScreenToggleLightSensorState = analogRead(screenToggleLightSensorPin);

  Serial.print("setup value of previousScreenToggleLightSensorState: ");
  Serial.println(previousScreenToggleLightSensorState);
}

void loop()
{

  // Read the screen toggle light sensor.
  int screenToggleLightSensorState = analogRead(screenToggleLightSensorPin);

  // Read the screen toggle push button.
  int screenToggleButtonState = digitalRead(screenToggleButtonPin);

  // If the button state has changed.
  if ((screenToggleButtonState != previousScreenToggleButtonState) && (screenToggleButtonState == HIGH))
  {
    // Turn the led on to indicate button press processed and key combination sent.
    digitalWrite(led, HIGH);

    toggleDevice();

    // Save the current light sensor state.
    previousScreenToggleLightSensorState = screenToggleLightSensorState;

    // Wait for a second, blocking more button presses and then turn the led off.
    delay(200);
    digitalWrite(led, LOW);
  }

  // Save the current button state.
  previousScreenToggleButtonState = screenToggleButtonState;

  //
  //
  //

  // Read the screen toggle push button.
  int refreshButtonState = digitalRead(refreshButtonPin);

  // If the refresh button state has changed.
  if ((refreshButtonState != previousRefreshButtonState) && (refreshButtonState == HIGH))
  {
    // Turn the led on to indicate button press processed and key combination sent.
    digitalWrite(led, HIGH);

    Serial.println("Refresh button pressed.");

    // Send a control-r key combination.
    Keyboard.press(ctrlKey);
    Keyboard.press('r');
    delay(100);
    Keyboard.releaseAll();

    digitalWrite(led, LOW);
  }

  // Save the current button state.
  previousRefreshButtonState = refreshButtonState;

  //
  //
  //

  int diff = previousScreenToggleLightSensorState - screenToggleLightSensorState;

  // If the light level has changed enough, toggle the device status.
  if( (diff > 200) && (currentDeviceState == 0) )
  {
    Serial.println("Light sensor state has brightened and current state is off, turning on.");

    Serial.print("    previousScreenToggleLightSensorState: ");
    Serial.println(previousScreenToggleLightSensorState);

    Serial.print("    screenToggleLightSensorState: ");
    Serial.println(screenToggleLightSensorState);

    toggleDevice();

    // Save the current light sensor state.
    previousScreenToggleLightSensorState = screenToggleLightSensorState;

  }
  else if( (diff < -250) && (currentDeviceState == 1) )
  {
    Serial.println("Light sensor state has dimmed and current state is on, turning off.");

    Serial.print("    previousScreenToggleLightSensorState: ");
    Serial.println(previousScreenToggleLightSensorState);

    Serial.print("    screenToggleLightSensorState: ");
    Serial.println(screenToggleLightSensorState);

    toggleDevice();

    // Save the current light sensor state.
    previousScreenToggleLightSensorState = screenToggleLightSensorState;
  }

}

void toggleDevice()
{

  if (currentDeviceState == 1)
  {
    Serial.println("Device state is currently on, turning off.");

    // Send a WINDOWS-0 key combination.
    Keyboard.press(KEY_LEFT_GUI);
    Keyboard.press('0');
    delay(100);
    Keyboard.releaseAll();

    currentDeviceState = 0;
  }
  else if (currentDeviceState == 0)
  {
    Serial.println("Device state is currently off, turning on.");

    // Send a WINDOWS-0 key combination.
    Keyboard.press(KEY_LEFT_GUI);
    Keyboard.press('1');
    delay(100);
    Keyboard.releaseAll();

    currentDeviceState = 1;
  }

}
Plugin and test on Raspberry Pi.